
Monday, January 7, 2019
Go See My Behance
From now on, I will no longer be using Blogger for my portfolio, going to Behance instead. If you're here because you actually want to see my work, you can see my newer projects at https://www.behance.net/condkc9adf7. If you go there, you can see cool stuff like this:
 Thank you!

Friday, May 18, 2018
End of Junior Year Reflection
 So Junior year is almost over now, and that means its time for another blog post. Having animation two hours a day everyday was really cool and helped me really get into and learn more about animation, particularly on the 3-D side. I finished my castle, redoing some stuff, and entered it into e-Magine, where I got third place in my category. Looking at the finished product compared to what I was doing even at the beginning of the year, I'm certainly learning a lot. I've also been playing around with some new techniques, which will hopefully make it into future projects. Things I've learned this year include:
Technical Skills:
Throughout the year, I've learned how to use many new features in Maya. In the castle alone, I had to figure out particle effects, texturing (beyond just clicking the "do-all-the-work-for-me" button), and various lighting tools. Since then, I found the flow path tool and after playing around with it for a bit, realized that I could make a roller coaster with it. The idea evolved, and I ended up making a full coaster, and for some reason, I decided to make it in VR. This opened me to the "amazing" world of rendering. There were so many things that made this process so hard. First of all, to use the spherical camera, I had to render in Arnold. After having to redo all my lighting, I realized that I couldn't batch render, so it took literally 48 hours on two computers to render each frame in sequence. It looks pretty cool, though, and it introduced me to a whole part of 3-D animation I knew virtually nothing about.
 |
| My Fish, modeled and textured, but never implemented -_- |
Collaboration:
This quarter, I worked with some other people to make a group project: some animated fish meant to teach children how to count. At the beginning, it seemed like it was actually going to turn out good. However, we didn't exactly plan very much, which kind of delayed the project...indefinitely since the seniors are done now. Technically we have the parts complete: all the fully animated models, narration, and a good background. We just didn't ever get to put it together. I guess we all need some better collaboration skills.
Communication:
While we didn't finish, we did a fair amount of communicating in the fish project. Especially in the planning phase, we actually thought it through and had some pretty good ideas. We had it all planned out on who was going to do what and what it was going to be in the end, but as previously mentioned, it didn't turn out like that.
 I've never really had any problems with project management. I tend to get everything done on time, in this class anyway. I find animation fun, so its not like doing math homework or something. Actually, because of the time I put into these projects, I've made several models just for fun. The roller coaster is the biggest example, but I've made some other weird things, too: this Rubik's cube made out of Rubik's cubes (Rubik's tesseract), a hypnotic ring of gears, and a couple of optical illusions. Also, my previous statement about getting work done on time may seem to go against the fish project never being finished, but, not naming any names, some people didn't exactly do what they said they would.
Project Management:

Leadership:
There isn't really much of a chance to be a leader in Animation. Maybe we should've had one on the fish project, but we were kind of all co-leaders. I guess you could say I was a leader by example, people tell me that sometimes, but I could definitely get better in this category.
So this year was certainly interesting. I've mentioned it before, but having Animation two hours a day is really a big help when it comes to doing big projects. Looking through all my works on Youtube, I just seem to be getting exponentially better. Hopefully this continues into next year and beyond, learning everything I can along the way.
Last Semester's Reflection: https://goo.gl/WgNmVS
Tuesday, December 19, 2017
First Semester Reflection
Since my last post, I've finished the castle I was working on and I also tried some 2-D stuff, which I really haven't done in over a year, as my short story animation was posted last October. It was kind of a nice change of pace (though I prefer and am much better at 3-D) from all the work I spent on the Castle. Speaking of which...
Like I said previously, I finished an early render of the castle exterior, and I think it looks pretty good. I probably say this in like every post I write, but this is the biggest, most complicated project I've done, and probably will stay that way, at least until next year maybe. This was the first time I've used multiple Maya files in a project, which ended up being helpful because it let me just work on certain pieces separately, then arrange them all together. There was one problem, though, when I accidentally made the stone texture be lambert1. Don't do this. It took like hours to redo the UV mapping in a new texture. I got it back eventually, though, and it looks okay. Another thing, which I didn't even realize until much later, is that the moon moves. And the way that my lights are set up, I don't even need a moon; my lights are coming from behind the camera, so the moon makes no sense. I'm currently working on a second version, though, with some upgrades, including grass, higher-quality textures, and no moon. Additionally, I'm also making a second scene using some models I didn't use in the exterior. Hopefully it turns out good; the lights, especially the shadows off the chains, look really cool so far.
As my first semester having Animation two hours a day, this was pretty good. I got a lot done and learned more, too. And even though I probably won't be doing another 2-D animation anytime soon, it was a pretty good experience. I'm still working on the castle, too, and a finished version will likely be finished by the end of spring.
Gothic Castle
 |
| A test render of the second scene |
Rotoscoping Project- Tornado Kick
My second project of the quarter was a bit more out of my comfort zone. I've never been that good at drawing people, so rotoscoping 38 frames seemed a bit intimidating. Thankfully, it ended up being a bit easier than expected, if not really time consuming. Filming was probably my favorite part of the whole thing. I've always wanted to incorporate my Tae Kwon Do into an animation, and this was my chance (though I really want to do Mo-Cap some day☺). Getting the whole thing set up in Photoshop was next, and a bit of a pain. There was a bunch of stuff to do, like making it 15 FPS instead of 30, and setting up the Animation Timeline. When I started drawing, I tried to use a tablet, but I couldn't get used to the really high sensitivity, so I ended up just using keyboard/mouse. Two weeks later, when the actual rotoscoping was done, I colored it, then added a background. On the background, the flags were surprisingly difficult; On the US flag, I think there are only like 41 stars, and the South Korean one was just hard in general. It looks pretty cool, though, and in the video, I put in all the different versions to show the whole progression of my work.
As my first semester having Animation two hours a day, this was pretty good. I got a lot done and learned more, too. And even though I probably won't be doing another 2-D animation anytime soon, it was a pretty good experience. I'm still working on the castle, too, and a finished version will likely be finished by the end of spring.
Monday, October 16, 2017
Quarter 1 Animation
It's junior year, and the mediocre blog posts continue! First quarter of Animation so far was kind of different, but in a good way. I've completed two projects this year, and am currently working on a third. Here are my thoughts and details on all three.

 This project started out similar to any of the projects we did last year, a basic model in Maya. For my fish, I was kind of inspired by the shower curtain in my bathroom. I guess looking at it every morning for the last 15 years ingrained it in my mind.
I started out by drawing it on paper, then I scanned it into Maya, and used it as a reference to model. After making it look pretty good, I made a texture for it. Something went weird here, making everything slightly transparent, but other than that, it went pretty well. Next, we rigged the fish, which I didn't find too difficult, since I taught myself how to rig last year. Last, I animated the joints to make the fish swim, adding a little piece of fish food for some reason. I didn't render this one, so the video is just a rough playblast.
 My most recent, and most likely most complicated project yet is my gothic castle. I've always been kind of interested in architecture, so I decided to make a building for my first semester project. The idea to make a gothic castle specifically came from the game Bloodborne, which is heavily inspired by gothic architecture and culture. I was kind of obsessed with the game over the summer, so it was the first thing that came to mind. Recently, I've also been using Hogwarts castle from Harry Potter as a reference.
So far, I've only made a few models for the project, just simple gothic castle-ey stuff. I started with the arches, maybe one of the most pronounced features of gothic architecture. Since then, I've made a few towers, a gate, and am currently making the main hall area.
My plan for this project is to put all the pieces together and then do a camera fly through as if it were a person touring the castle. Depending on how much time I have, I may try to work in some plot portrayed by the environment, but I'm not at that point yet. This project could turn out really cool, and I hope it does. We'll see at Thanksgiving...
Picture Animation
The first project of the year was a simple story made from 30(ish) pictures edited and spaced out with a soundtrack in the background. There isn't a lot to say about this one; I used some of the skills from Video that I learned last year (six shot system and basic framing stuff) to make an animated story.
The Fish Project

 This project started out similar to any of the projects we did last year, a basic model in Maya. For my fish, I was kind of inspired by the shower curtain in my bathroom. I guess looking at it every morning for the last 15 years ingrained it in my mind.
I started out by drawing it on paper, then I scanned it into Maya, and used it as a reference to model. After making it look pretty good, I made a texture for it. Something went weird here, making everything slightly transparent, but other than that, it went pretty well. Next, we rigged the fish, which I didn't find too difficult, since I taught myself how to rig last year. Last, I animated the joints to make the fish swim, adding a little piece of fish food for some reason. I didn't render this one, so the video is just a rough playblast.
Castle Model (work in progress)
 My most recent, and most likely most complicated project yet is my gothic castle. I've always been kind of interested in architecture, so I decided to make a building for my first semester project. The idea to make a gothic castle specifically came from the game Bloodborne, which is heavily inspired by gothic architecture and culture. I was kind of obsessed with the game over the summer, so it was the first thing that came to mind. Recently, I've also been using Hogwarts castle from Harry Potter as a reference.
So far, I've only made a few models for the project, just simple gothic castle-ey stuff. I started with the arches, maybe one of the most pronounced features of gothic architecture. Since then, I've made a few towers, a gate, and am currently making the main hall area.
My plan for this project is to put all the pieces together and then do a camera fly through as if it were a person touring the castle. Depending on how much time I have, I may try to work in some plot portrayed by the environment, but I'm not at that point yet. This project could turn out really cool, and I hope it does. We'll see at Thanksgiving...
Wednesday, May 24, 2017
End of Year Animation Reflection
This year is animation was pretty cool. I learned so much, and made some really neat projects. All of the things I've done here made it one of my favorite classes, not just in this year, but in my entire time in school.
One of the most important and relevant skills in animation is the technical knowledge of the programs. I learned how to do a lot of things in After Effects this year, and even more in Maya; from the basics of just making something move, to more complicated things with Mattes and stuff. I even taught myself how to rig a 3-D character for the final video. I'm definitely not perfect yet, probably wouldn't even be considered great, but that's why I'm continuing on next year.
Aside from the final project, there wasn't a whole lot of collaboration in animation. But on that final project, there was a lot. It kind of felt like I was part of a real movie studio (a really amateur one, anyway), with everyone kind of contributing a different part of the whole project.
That group project was also where communication came in. We all kind of discussed the idea for the story, and later on communicated what everybody was doing so we could get the project done on time. Besides that, this blog is kind of the main communication thing for me. It tells my thoughts on all the projects I've finished and what I learned from them.
Project management was pretty vital for a lot of animation, especially in software that kind of goes crazy on you if you put something in the wrong place. I've always been an organized person, and that really helped this year. While other students' desktops are super cluttered, random png's all over the place, I have mine sorted out pretty good. I have folders and subfolders, and more folders in those. It's actually probably too organized, now that I think about it...
There wasn't really a lot of opportunities for leadership in this class. The only example I can think of is on the group project. I was kind of in charge of a lot of the special effects stuff, so my group members kind of consulted me occasionally. Maybe there will be more leadership stuff in the future, but leadership isn't really my best quality, either.
Sophomore Animation was really fun, and I learned a ton of new skills. Even though I still know very little compared to how much there is, I've gotten a lot better, and plan to get even more so next year.
One of the most important and relevant skills in animation is the technical knowledge of the programs. I learned how to do a lot of things in After Effects this year, and even more in Maya; from the basics of just making something move, to more complicated things with Mattes and stuff. I even taught myself how to rig a 3-D character for the final video. I'm definitely not perfect yet, probably wouldn't even be considered great, but that's why I'm continuing on next year.
Aside from the final project, there wasn't a whole lot of collaboration in animation. But on that final project, there was a lot. It kind of felt like I was part of a real movie studio (a really amateur one, anyway), with everyone kind of contributing a different part of the whole project.
That group project was also where communication came in. We all kind of discussed the idea for the story, and later on communicated what everybody was doing so we could get the project done on time. Besides that, this blog is kind of the main communication thing for me. It tells my thoughts on all the projects I've finished and what I learned from them.
Project management was pretty vital for a lot of animation, especially in software that kind of goes crazy on you if you put something in the wrong place. I've always been an organized person, and that really helped this year. While other students' desktops are super cluttered, random png's all over the place, I have mine sorted out pretty good. I have folders and subfolders, and more folders in those. It's actually probably too organized, now that I think about it...
There wasn't really a lot of opportunities for leadership in this class. The only example I can think of is on the group project. I was kind of in charge of a lot of the special effects stuff, so my group members kind of consulted me occasionally. Maybe there will be more leadership stuff in the future, but leadership isn't really my best quality, either.
Sophomore Animation was really fun, and I learned a ton of new skills. Even though I still know very little compared to how much there is, I've gotten a lot better, and plan to get even more so next year.
Tuesday, May 23, 2017
End of Year Video Reflection
This year in Video was pretty good. I learned a lot of stuff, had a lot of fun, and made some cool videos. Even though I'm not continuing video next year, all the skills I've gained should help me into the future anyway.
In terms of technical skills, I started to learn some of the more advanced effects you can do in Premiere. In my most recent project, the short film, I learned some color correction and lighting effects, as well as some audio effects like filtering out wind (sort of).
The skills I probably had to use the most were collaboration and communication. Most of the time, they kind of went together. Throughout all of the second semester projects, I had to work in a team to get videos done. Whether it was knowing what to say in a shot, or even something as simple as telling when the camera was filming, communication was important. This semester was also probably some of the most fun I've had in e-Comm. I have some great memories: filming our music video up on the catwalk, being generally dumb for the Napoleon Dynamite trailer, and making an actual short film. Working with other people was really fun and helpful. Even when things went wrong (messing up a line, wearing the wrong clothes for a scene, or the daily "forgetting to fix the audio settings"), we learned from it, and got better.
Project management has always been somewhat of a natural skill for me. I usually get projects done on time, and I'd say they turn out fine. I do have a habit of getting distracted with most work, but I have an unnatural like for editing, so I usually go for like three hours straight, but I don't even care, because it's fun to me. Time managing while filming is fine, too. There have been many days where we goof around too much and don't get much done, but we've always finished on time.
Leadership is still probably my weakest quality. Most of it is just the fact that I just hate telling other people what to do, but I'm not a good leader anyway. I probably have gotten better, though; I feel a bit more comfortable in leading, at least in video, though it's probably just me being a perfectionist.
Overall, this year was great. I've honestly probably learned more in my eComm classes this year than any of my other classes, except maybe Japanese... but this is an eComm blog, so that doesn't matter. All the projects turned out pretty good, and even when things didn't turn out how I wanted them to, I still learned something.
Monday, May 22, 2017
How to Rig a Basic Figure in Maya
In animation, one of the most important skills for making a 3-D character is rigging: putting a skeleton in a body and making it move right. A lot of the steps are really time consuming and boring, but in the end, taking your time will make it look much better. This guide will show you how to do the very basics of rigging.

Step 1: Make a Character
Obviously, if you want to animate a character, you need a model to rig. For this tutorial, I'll be using one of the base meshes in Maya, but if you're good at modeling, you can use your own.
Step 2: Make a Skeleton
To make the body actually move, you need joints to move around. If you're making a more complex character, you'll have to make all the joints individually, but a pre-made human skeleton is already in Maya, under Human IK in the rigging tab. To make the next part easier, turn on Xray Joints, near the top right of the display window.
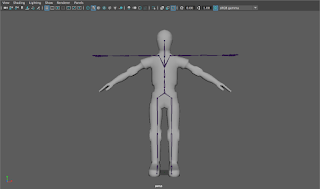
Step 3: Move the Joints into Place
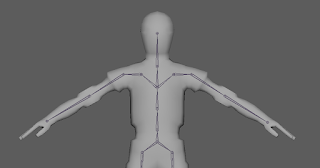 The next, and most important, step is placing the joints. Using the Orthographic views (Top, Side, and Front) will be really useful for this, since the angle of the perspective view may throw off the placement. To move the joints into place, go to the front view, and select each joint to move it into the position where it should approximately be on a human. However, the placement should also be at the center of mass, which will be important later. Selecting multiple joints to move at once can help to keep the symmetry. Once you move all the joints into place, repeat on the other 2 Ortho views to get them into position on all 3 axes. If you notice that my skeleton has no hands, that's because I don't want to take the time to do it, but if you're planning to use the skeleton for a complex animation, you would want to do the same positioning for the hands. When you're sure your finished, select the skeleton (clicking on the middle hip joint selects it all) and the model, and then click Bind Skin.
Step 4: Skin Weighting
 Skin weighting is the most difficult, but a really important part of character animation, is skin weighting. Since there aren't actually bones in the model, you have to tell Maya how much each bone pulls on the skin. If you leave the weights how they are by default, it's not going to look good, like the whole thing is made of rubber or something. To start painting weights, select the "Paint Skin Weights" tool under the Skin menu you used earlier. Selecting this should show a Color Ramp (looks like an infrared camera). If it doesn't, you can enable it in the gradient tab of the tool settings. To do a very simple weighting job, set the value to 0 and the paint operation to replace. Then, Select the joint you want to weight paint, and click Select Geometry. Now you can paint all the areas that shouldn't be affected until they appear black (signifying no pull on that area). One area that you should remove on the hips, for example, is on the hands. Other important areas are the foot opposite to the one of the selected joint, and the same thing with fingers (if you have joints in them). To check if your weighting is doing fine, move a joint around and see if it looks natural. To make it look more professional, you would want to add more weight to areas, but for the purposes of this tutorial, just removing weights should be sufficient.
Now if you move your joints around in positions a human could potentially do, they should look much better. If you want, you now have a model you can use to do some animations.

Step 1: Make a Character
Obviously, if you want to animate a character, you need a model to rig. For this tutorial, I'll be using one of the base meshes in Maya, but if you're good at modeling, you can use your own.
Step 2: Make a Skeleton
To make the body actually move, you need joints to move around. If you're making a more complex character, you'll have to make all the joints individually, but a pre-made human skeleton is already in Maya, under Human IK in the rigging tab. To make the next part easier, turn on Xray Joints, near the top right of the display window.

Step 3: Move the Joints into Place
 The next, and most important, step is placing the joints. Using the Orthographic views (Top, Side, and Front) will be really useful for this, since the angle of the perspective view may throw off the placement. To move the joints into place, go to the front view, and select each joint to move it into the position where it should approximately be on a human. However, the placement should also be at the center of mass, which will be important later. Selecting multiple joints to move at once can help to keep the symmetry. Once you move all the joints into place, repeat on the other 2 Ortho views to get them into position on all 3 axes. If you notice that my skeleton has no hands, that's because I don't want to take the time to do it, but if you're planning to use the skeleton for a complex animation, you would want to do the same positioning for the hands. When you're sure your finished, select the skeleton (clicking on the middle hip joint selects it all) and the model, and then click Bind Skin.
Step 4: Skin Weighting
 Skin weighting is the most difficult, but a really important part of character animation, is skin weighting. Since there aren't actually bones in the model, you have to tell Maya how much each bone pulls on the skin. If you leave the weights how they are by default, it's not going to look good, like the whole thing is made of rubber or something. To start painting weights, select the "Paint Skin Weights" tool under the Skin menu you used earlier. Selecting this should show a Color Ramp (looks like an infrared camera). If it doesn't, you can enable it in the gradient tab of the tool settings. To do a very simple weighting job, set the value to 0 and the paint operation to replace. Then, Select the joint you want to weight paint, and click Select Geometry. Now you can paint all the areas that shouldn't be affected until they appear black (signifying no pull on that area). One area that you should remove on the hips, for example, is on the hands. Other important areas are the foot opposite to the one of the selected joint, and the same thing with fingers (if you have joints in them). To check if your weighting is doing fine, move a joint around and see if it looks natural. To make it look more professional, you would want to add more weight to areas, but for the purposes of this tutorial, just removing weights should be sufficient.
Now if you move your joints around in positions a human could potentially do, they should look much better. If you want, you now have a model you can use to do some animations.
Tuesday, May 16, 2017
Review: INVASION!
I'm a big fan of virtual reality, so when I saw a VR animated short film, I watched it almost immediately. "INVASION!" is an animated short currently on most VR platforms. It was made by Baobab Studios, led by previous employees of Pixar and Dreamworks, so I expected something great.
 The story is about a rabbit and his encounter with some aliens, but despite the simple premise, it's pulled off really well. From a nice establishing shot in space (narrated by Ethan Hawke), all the way to the "Invasion" the short is named for, everything goes together very nicely. The character designs are all really beautiful, and their expressions tell the viewer exactly what they're thinking, since there is no dialogue (in english, anyway. The aliens talk, but in a cute gibberish). The aliens, named Mac and Cheez, are really what drive the story, being the source of most of the comedy, which reminds me of some of the old Mickey Mouse or Looney Tunes shows; a childish, slapstick feel. But just because it looks like a kids movie, anyone would really appreciate it.
The VR works well, too. It always makes you feel like part of the action. A lot of 360 degree videos are confusing, with nothing really directing your eyes where to look, but it works well in this short. Since there is 3-D audio, you can usually hear where the action is going on, and if you get turned around, you can just look at the rabbit (who is standing right over your shoulder for most of the video, further making you feel immersed) to see where to look. His eyes are always clearly pointed towards the action, which is a really nice detail.
In conclusion, I think "INVASION!" really shows that animation, as well as other video entertainment has a good future in virtual reality. "INVASION!" even won a Daytime Emmy earlier this year, which hopefully inspires others to explore this medium. When Baobab releases the sequel, "ASTEROIDS!", later this year, I hope even more people will be able to see this awesome storytelling experience.
Baobab's website: http://www.baobabstudios.com/invasion/

The VR works well, too. It always makes you feel like part of the action. A lot of 360 degree videos are confusing, with nothing really directing your eyes where to look, but it works well in this short. Since there is 3-D audio, you can usually hear where the action is going on, and if you get turned around, you can just look at the rabbit (who is standing right over your shoulder for most of the video, further making you feel immersed) to see where to look. His eyes are always clearly pointed towards the action, which is a really nice detail.
In conclusion, I think "INVASION!" really shows that animation, as well as other video entertainment has a good future in virtual reality. "INVASION!" even won a Daytime Emmy earlier this year, which hopefully inspires others to explore this medium. When Baobab releases the sequel, "ASTEROIDS!", later this year, I hope even more people will be able to see this awesome storytelling experience.
Baobab's website: http://www.baobabstudios.com/invasion/
The Use of Neural Networks in Animation
Making animations to use in video games, especially in 3-D, is a really long, difficult task. I tried to do some animation work a little while back, and I found this the hard way. Knowing how to make walk, jump, and many other animated cycles takes a while, and getting them to interact with the environment correctly is really hard. This is why researchers at the University of Edinburgh are looking to use neural networking, along with motion tracking, to make more realistic, smooth movements.
Motion capture has been used in games and animated films for a while, using real-life footage as a basis for the movements of a character, but it can only go so far. You need animations for every possible combination of moves, such as, as the article says, climbing up stairs while crouching and drawing a bow. In the current method of animating, animations would have to be made for each unique scenario, but neural networks can fix this. The program adjusts the movements based on the input given, and the data based system makes the animations fit.
Even though this system is very complex, and likely won't be implemented in anything more than a tech demo for a while, it shows that this technology can be used in animation, and that should make all animators breath a sigh of relief for the future.
Original Article: http://theorangeduck.com/page/phase-functioned-neural-networks-character-control
Motion capture has been used in games and animated films for a while, using real-life footage as a basis for the movements of a character, but it can only go so far. You need animations for every possible combination of moves, such as, as the article says, climbing up stairs while crouching and drawing a bow. In the current method of animating, animations would have to be made for each unique scenario, but neural networks can fix this. The program adjusts the movements based on the input given, and the data based system makes the animations fit.
Even though this system is very complex, and likely won't be implemented in anything more than a tech demo for a while, it shows that this technology can be used in animation, and that should make all animators breath a sigh of relief for the future.
Original Article: http://theorangeduck.com/page/phase-functioned-neural-networks-character-control
Friday, April 7, 2017
Skateboarding Dog Animation
This project was my first introduction to some simple special effects. Nothing too fancy, but still cool for my first attempt. First, I had to make the 3D model. For the dog, I had to trace around a picture of a real dog. The hard part of this was making the legs and the ears have a space in the middle so it wasn't just a block dog. Fortunately, it was supposed to be a wooden toy, so I didn't have to give the sides any depth. The skateboard was actually the easiest part. The only problem I ran into was getting the grip textures to look right with the curvature of the deck.
Next, I put a picture of a real-world hallway behind the dog. It took a few minutes to match the floor of the hallway with the "floor" of the model, but it wasn't really hard. The hard part came with the lights. Because it was an interior scene, I used area lights, which were new to me at the time. It was hard to know where to place the lights because the angle of the shot didn't show a lot of the lights on the ceiling, so I kind of had "trial-and-error" it. However, I think I placed them in fairly accurate places.
Next, I put a picture of a real-world hallway behind the dog. It took a few minutes to match the floor of the hallway with the "floor" of the model, but it wasn't really hard. The hard part came with the lights. Because it was an interior scene, I used area lights, which were new to me at the time. It was hard to know where to place the lights because the angle of the shot didn't show a lot of the lights on the ceiling, so I kind of had "trial-and-error" it. However, I think I placed them in fairly accurate places.
Friday, March 10, 2017
Trailer Recreation
In concept, this project was a bit simpler: recreating a pre-existing movie trailer. But this ended up being one of the most complex videos I made so far. The movie trailer my group decided to make was Napoleon Dynamite, which ended up giving us some pretty funny experiences.
This was the first video we had to make a serious script for, which should have been easy, but Napoleon's deep voice combined with the 13 year old video make the audio hard to hear. We were able to figure it out in the end, though, and got filming. The shots were pretty straight forward, only two pans and no dolly shots. The outside ones were probably the most difficult, requiring some strategic camera placement to block the wind. On a few, we also had to green screen in the parking lot over Aiden.
I feel like we did a good job doing a shot-for-shot recreation of the trailer (aside from the tetherball scene), and the music timed up pretty well, only a few beats off from the original in a few places. However, to make the shots heard over the song, I had to change the volume at places, which made it sound weird in areas. Besides that, this turned out pretty good.
This was the first video we had to make a serious script for, which should have been easy, but Napoleon's deep voice combined with the 13 year old video make the audio hard to hear. We were able to figure it out in the end, though, and got filming. The shots were pretty straight forward, only two pans and no dolly shots. The outside ones were probably the most difficult, requiring some strategic camera placement to block the wind. On a few, we also had to green screen in the parking lot over Aiden.
I feel like we did a good job doing a shot-for-shot recreation of the trailer (aside from the tetherball scene), and the music timed up pretty well, only a few beats off from the original in a few places. However, to make the shots heard over the song, I had to change the volume at places, which made it sound weird in areas. Besides that, this turned out pretty good.
Wednesday, February 1, 2017
Snowflake Animation
For this snowflake animation, I learned even more about Maya, probably spending way too much time trying to make it look cool. I think it turned out pretty good; the snowflakes themselves look good, and the set I made kind of adds to the scene.
 Making the snowflakes was probably the most fun part. Because they're all different, I made each one separately, and used the "soften edges" tool to make them look more realistic.
 Making the snowflakes was probably the most fun part. Because they're all different, I made each one separately, and used the "soften edges" tool to make them look more realistic.
Since the background would've been solid black otherwise, I came up with the idea to make some ground outside to give the idea that the house is in a snowy field near some mountains (or maybe they're just low-poly hills). Another thing I added was the flickering effect of the light. I discovered that keyframes can be added onto other attributes, like a light's intensity, so I made it look more like a candle or fireplace. So, I think this is one of my better animations, definitely ones in Maya. The stuff I figured out should really help in the future.
Tuesday, January 31, 2017
A Music Video
My latest project, and first for entertainment, was a music video. I'm not really the type of person who enjoys singing and dancing, but I found this project pretty fun. The pre-production stuff wasn't really all that different from last semester, and making the storyboards worked well. We based the shots off of the original music video (mostly for the vocal, lip-syncing parts) and some of the meaning in the lyrics.
The filming was great, some of the most fun I've had in e-Comm. I got to film Jacob getting thrown against a locker and getting kicked, and got to climb up to the auditorium catwalk (which is like at least two stories above the ground) for the singing parts. And even though we did kind of mess around, we actually got good footage.
The video was also pretty cool to edit. I learned how to use a lot of effects, even going as far as to spend literally an hour testing all of them to see what they did. Some of them, such as the color filters and the stabilization, helped a lot to fix some of the shortcomings. The hardest part was probably matching the lip-syncing up to the song (which I totally didn't pirate), because I had the camera set to the wrong mic for the first few clips and it just recorded static. Thankfully, Jacob's exaggerated motions gave me some idea where it was in the song.
Overall, this was a pretty good video. I wish we could've gotten more cinematic shots, but the song, as well as the time, kind of limited what we could do. The story, especially, could've been better. There were only like four shots explaining the story, and even though I thought those were good, everything could've been explained better. Also, some shots in the vocal section before the guitar solo were a bit long.
The filming was great, some of the most fun I've had in e-Comm. I got to film Jacob getting thrown against a locker and getting kicked, and got to climb up to the auditorium catwalk (which is like at least two stories above the ground) for the singing parts. And even though we did kind of mess around, we actually got good footage.
The video was also pretty cool to edit. I learned how to use a lot of effects, even going as far as to spend literally an hour testing all of them to see what they did. Some of them, such as the color filters and the stabilization, helped a lot to fix some of the shortcomings. The hardest part was probably matching the lip-syncing up to the song (which I totally didn't pirate), because I had the camera set to the wrong mic for the first few clips and it just recorded static. Thankfully, Jacob's exaggerated motions gave me some idea where it was in the song.
Overall, this was a pretty good video. I wish we could've gotten more cinematic shots, but the song, as well as the time, kind of limited what we could do. The story, especially, could've been better. There were only like four shots explaining the story, and even though I thought those were good, everything could've been explained better. Also, some shots in the vocal section before the guitar solo were a bit long.
Monday, December 19, 2016
1st Semester Portfolio
This semester, I learned a ton about animation, both 2-D in After Effects and 3-D in Maya. I also made a lot of projects using those skills, improving greatly over last year. Here are a few of my favorites:

 My most recent model at this time, this highlighter-pen was the first model I've made based off a real-world object. Being a cylindrical object, some parts of the pen were pretty difficult to make, while others were pretty easy. I spent a lot of time making sure the curves of the pen body were just like the real pen. I also made sure the cap was good, with the clip and especially where the solid plastic transitions to transparent. However, this transition, because it was partially transparent, wasn't straight on with the solid part, so it intersected, showing that it was't completely realistic. I'm pretty sure there's a way to take out the intersection, but I couldn't find it while I was modeling. Overall, though, did turn out pretty well, at least recognizable as my pen.
Walk Cycle:
One of the earlier works I did this year, this simple walk cycle was my first time making a humanoid character, so I had to use aspects such as joints and easing to make it look realistic. Additionally, I didn't use Photoshop to draw my character (the Pug Butler), but instead drew it on paper and scanned it in. I liked this project because it was my introduction to character animation, which is a field I'm interested in. As my first time, it wasn't perfect, though, as some of the motions I made to make the walk look realistic, such as the head bobbing and arms swaying, looked kind of unnatural in the end. In the future, I'll need to keep fine-tuning the movements to learn how to make it look smooth.
The Delivery:
My first true story animation, The Delivery is currently the largest scale project I've made, taking many hours and lots of work to finish. It incorporated all I had learned in previous projects, including the walking from the project above, but I also learned much more, on my own and from others. Throughout my work, I ran into several situations where I needed to incorporate tools I didn't know (such as the Track Mattes I've posted about previously), so I just had to look up how to make it work, giving me more skills for future projects while making this one better. While this is definitely my best 2-D animation yet, improving all I had done in previous projects like the walk cycle, but still, I could've changed some things a bit to make it even better. After seeing peoples' reactions to it, I realized that I'm the only one that understood the story 100%, so adding small things, like music and sound effects, would likely add a lot to the atmosphere.
Hammer:

After I got used to working in the 3-D environment of Maya, the first complex model I made was this hammer. I learned many tools within Maya making this that I've used a lot since then. This was the first model I made where I had to move specific faces and vertices, which is a vital skill to have when designing anything that isn't as simple as a sphere or cube. I also used Bevels to make the rounded hammer head and the handle look more realistic. This was also the first time I used lighting on a real model, and I used a spotlight to really emphasize the hammer in the image. In this picture, I noticed that the shadows, as well as the edges of the spotlight are a bit rigid, but as I continued to work in Maya, my knowledge of "what does what" in the lighting has gotten better now.
Ice Cream:
This was the first true 3 dimensional animation I made, and for the first one, it turned out pretty smooth. To make it look like a true scene instead of just floating in a void, I made a set, with walls, a floor, and a table in a room. Besides some basics in the Castle project, this was the first time I used textures extensively, in the ice cream itself to give it bumps, but also in my own places, like the tile floor or the painting on the wall. I had to do a lot of experimenting with all the tools to get everything right, but it ended up working out fine. I also learned how to use the Outliner, which came in handy for grouping just the right shapes to rotate for the animation, making sure to include the 3-D texture boxes so the patterns on the ice cream didn't move. Really, I'm not sure what I would change in this project; I could zoom into the main rotating area, but then, the set I worked so hard on wouldn't be seen, so I'm fine with it as it is.
Pen:
 My most recent model at this time, this highlighter-pen was the first model I've made based off a real-world object. Being a cylindrical object, some parts of the pen were pretty difficult to make, while others were pretty easy. I spent a lot of time making sure the curves of the pen body were just like the real pen. I also made sure the cap was good, with the clip and especially where the solid plastic transitions to transparent. However, this transition, because it was partially transparent, wasn't straight on with the solid part, so it intersected, showing that it was't completely realistic. I'm pretty sure there's a way to take out the intersection, but I couldn't find it while I was modeling. Overall, though, did turn out pretty well, at least recognizable as my pen.
Thursday, December 15, 2016
Review: Dia de los Muertos
Near the end of October, my mom showed me this video that she found about Dia de los Muertos, and it turned out being a really well designed animated short, especially for being made by three college students. The video, named after the Mexican holiday, is a very interesting story about a girl overcoming grief and celebrating her mother on the Day of the Dead. The way that the story is told is really cool because it shows that a good story doesn't require a lot of exposition or talking to set up a plot that not only can be easily followed, but also invoke emotions, ranging from sadness to fear to happiness, all in three minutes.

In addition to the story elements, the animation work in this short helps amplify all the previously mentioned successes of the video. For one, the design of the characters is great. The range of expressions that the skeletons made throughout the story was impressive, and the girl, from her movements and behavior, to her expressive stylized facial features, made the characters look memorable, resembling movies by giant studios like Disney and Pixar. In the future of my own animations, I hope I'll be able to integrate all the cool things that were done with the characters here to make something great, too.
If there was one thing I thought was a bit weak in the video was the pacing; I understand the reasons the story went so fast, but I had to watch the video multiple times to fully see everything that was going on. In the context of this story, it was fine, but for most videos, it was a bit fast.
Overall, this was a really great short that really showed what just a few animators can do with a good idea and the tools and knowledge to craft it.
Video: https://youtu.be/-v4-1wFEzM0

In addition to the story elements, the animation work in this short helps amplify all the previously mentioned successes of the video. For one, the design of the characters is great. The range of expressions that the skeletons made throughout the story was impressive, and the girl, from her movements and behavior, to her expressive stylized facial features, made the characters look memorable, resembling movies by giant studios like Disney and Pixar. In the future of my own animations, I hope I'll be able to integrate all the cool things that were done with the characters here to make something great, too.
If there was one thing I thought was a bit weak in the video was the pacing; I understand the reasons the story went so fast, but I had to watch the video multiple times to fully see everything that was going on. In the context of this story, it was fine, but for most videos, it was a bit fast.
Overall, this was a really great short that really showed what just a few animators can do with a good idea and the tools and knowledge to craft it.
Video: https://youtu.be/-v4-1wFEzM0
The Future of Virtual Realty
Virtual Reality has become more popular than ever in the past few years, with new additions like the HTC Vive and Playstation VR, but its rise could have even bigger effects in the future. An interview between Time Magazine and the co founder of Alienware, Frank Azor, showed what may be coming soon for the industry.
One point that's particularly relevant to the animation industry is that, in a field that's growing to be as big as any other technology industry, lots of different companies will have a chance at building a complete experience. While companies like Oculus and HTC are making the hardware, others, like Intel or Nvidia, are improving the graphics, and tons of animators and designers will be able to create work for the platform. As Azor said, 'VR is the same type of thing; no one company can solve all of the problems.'
Companies like Alienware are giving an optimistic view of the future for virtual reality, and I think it could definately become what they see. The industry has already advanced immensely since the technology was first designed, and the uses it could have could help even more.
Original Article:
http://time.com/4324598/alienware-interview-virtual-reality/
One point that's particularly relevant to the animation industry is that, in a field that's growing to be as big as any other technology industry, lots of different companies will have a chance at building a complete experience. While companies like Oculus and HTC are making the hardware, others, like Intel or Nvidia, are improving the graphics, and tons of animators and designers will be able to create work for the platform. As Azor said, 'VR is the same type of thing; no one company can solve all of the problems.'
Companies like Alienware are giving an optimistic view of the future for virtual reality, and I think it could definately become what they see. The industry has already advanced immensely since the technology was first designed, and the uses it could have could help even more.
Original Article:
http://time.com/4324598/alienware-interview-virtual-reality/
Monday, December 5, 2016
How to Create a Track Matte in After Effects

 To fix this, you need to use Track Mattes to limit the edges of the face.
Step 1: Click on the "Toggle Switches/Modes" button. This will show the Mode and TrkMat options for all layers you have in your scene. This will be important later as that is how to get the Track Matte set up.

Step 2: Create a new Solid layer under the layer you want to move (the eyes in my animation).

Step 3: Double-Click on the Solid. This will pull up an editor, where you can move around the anchor and transform the layer in other ways. For this, you will need to use the shape tool to make a rectangle on the layer. The size of the rectangle will depend on what it is you want to put a Track Matte on.

Step 4: Close out of the window for editing the layer. After that, in the TrkMat bar you opened earlier, select Alpha on the Solid layer. The layer it says after "Alpha" should be the one you want to mask.

Step 5: From here, use the Transform sliders or just drag the Solid (shown by an empty box) to move the Track Matte box onto the area you want to mask.
If all of this goes right, you should have a working Track Matte, useful for lots of different situations to make a 2 dimentional story look more realistic and give it depth.
Tuesday, November 29, 2016
Review: "Can a Robot Love?"

The video was very well made, especially considering the extra steps that had to be included for using robotics. One thing that I felt was especially good was the storytelling. In a story without human characters or dialogue, it's often times hard to portray emotions, but all the robots in the video, even the ones that had no "faces" gave off their own unique feel. A lot of the shots were great, too. The sweeping establishing shots and the close ups of certain actions fit together, adding to the quality. However, as with all videos, there were some small problems. For one, some of the junkyard characters that were stop-motion animated looked a bit clunky at points, breaking the realism. Also, once the action started, it was a bit confusing what was going on. The action scene was really cool after the viewer figures out what's happening, but there isn't enough to introduce it.
There were a lot of things in this video that I would like to use at some point. For one, the use of panning and other movement makes a shot a lot cooler and can establish a location. Also, I think using stop-motion or other forms of animation within a live-action video is an awesome idea, and can make a fantastical situation like the one in the video a lot more realistic.
https://youtu.be/XgsZ6GnFglA
Corridor Digital. “Robots Programmed to Kill!.” Online video clip. YouTube. Youtube, 22 October, 2016. Web. 29 November, 2016.
Monday, November 28, 2016
Tae Kwon Do Feature
After the last feature story I made, I wanted this next one to be better, incorporating all the things that weren't so great last time, and keeping the good things from last time in. First of all, while I originally thought that my idea to do a story on marching band was a good idea (and I still think it could've been), my planning, especially for the B-Roll/nat. sound, was not great, giving me little to work with in the editing. This time, I chose a subject (Tae Kwon Do) that I know a lot about, and I got some much better footage with good sound with it. I was also able to get a variety of shots this time, fitting some more medium and close shots into the video.
I think the interviews were about the same quality as last time. I got the answers that I needed, and the sound was good, but they weren't amazing of anything. I did get some things better, though. For one, last time, the location wasn't very good, being a solid gray wall and a weirdly-lit basement. While I couldn't get a relevant location for Drew's interview, I was able to get Master Stephen's in front of the flags, which ended up being a bit better.
When looking at this video compared to the last one, I'd say that I'm still improving. In the final product, I got much better nat sound than last time, and also just improved a bit on all the other aspects that make a good story. It's not amazing yet, but I'd say that I'm getting closer.
Monday, October 31, 2016
Learning Maya
 Earlier last week, I started using Maya for 3-D models, and I'm really liking it so far. Previously, I made a few models in Sketchup, but I feel like Maya will allow me to do much more, especially when we get into the animating characters. My first project was just an intro, testing out all of the polygon tools to make some shapes.
Subscribe to:
Posts (Atom)