Step 1: Make a Character
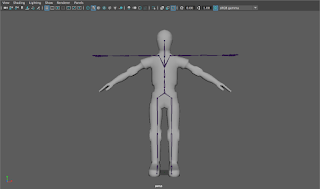
Obviously, if you want to animate a character, you need a model to rig. For this tutorial, I'll be using one of the base meshes in Maya, but if you're good at modeling, you can use your own.
Step 2: Make a Skeleton
To make the body actually move, you need joints to move around. If you're making a more complex character, you'll have to make all the joints individually, but a pre-made human skeleton is already in Maya, under Human IK in the rigging tab. To make the next part easier, turn on Xray Joints, near the top right of the display window.

Step 3: Move the Joints into Place
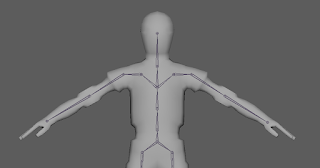
 The next, and most important, step is placing the joints. Using the Orthographic views (Top, Side, and Front) will be really useful for this, since the angle of the perspective view may throw off the placement. To move the joints into place, go to the front view, and select each joint to move it into the position where it should approximately be on a human. However, the placement should also be at the center of mass, which will be important later. Selecting multiple joints to move at once can help to keep the symmetry. Once you move all the joints into place, repeat on the other 2 Ortho views to get them into position on all 3 axes. If you notice that my skeleton has no hands, that's because I don't want to take the time to do it, but if you're planning to use the skeleton for a complex animation, you would want to do the same positioning for the hands. When you're sure your finished, select the skeleton (clicking on the middle hip joint selects it all) and the model, and then click Bind Skin.
Step 4: Skin Weighting
 Skin weighting is the most difficult, but a really important part of character animation, is skin weighting. Since there aren't actually bones in the model, you have to tell Maya how much each bone pulls on the skin. If you leave the weights how they are by default, it's not going to look good, like the whole thing is made of rubber or something. To start painting weights, select the "Paint Skin Weights" tool under the Skin menu you used earlier. Selecting this should show a Color Ramp (looks like an infrared camera). If it doesn't, you can enable it in the gradient tab of the tool settings. To do a very simple weighting job, set the value to 0 and the paint operation to replace. Then, Select the joint you want to weight paint, and click Select Geometry. Now you can paint all the areas that shouldn't be affected until they appear black (signifying no pull on that area). One area that you should remove on the hips, for example, is on the hands. Other important areas are the foot opposite to the one of the selected joint, and the same thing with fingers (if you have joints in them). To check if your weighting is doing fine, move a joint around and see if it looks natural. To make it look more professional, you would want to add more weight to areas, but for the purposes of this tutorial, just removing weights should be sufficient.
Now if you move your joints around in positions a human could potentially do, they should look much better. If you want, you now have a model you can use to do some animations.
No comments:
Post a Comment